Lanphear Digital
A comprehensive archive of all the Lanphear and Friend' photos, videos, and etc.
How to Connect to the VPN
In order to change your user details such as your password you need to connect to the server's DSM. Leaving the DSM open to the internet is a big security risk so a VPN server was setup in order to let users outside of the local network to connect to it. In order to connect you'll need to download an OpenVPN client and give it a proper config file to work.
Steps (Desktop):
- Download the OpenVPN Client
- Follow the Installer's Instructions and open the software
- Download or Retrieve the "VPNConfig.ovpn" from a site admin
- Locate where the OpenVPN configuration path is at (i.e "C:\ Users\USER\OpenVPN\config") and place the file there
- Connect to the VPN and login with your current username and password
If you completed all the steps correctly you should be connected to the server's VPN and can access the DSM at: https://10.8.0.1:5001
Connecting to this VPN makes it act as if your device is connected to the local internet connection where the server is located. Meaning that you should be able to connect to the server's DSM page despite it being closed off to the external network.
Change your account details:
To change your account details you need to be connected to a VPN first. Once connected go to: https://10.8.0.1:5001/ and you should see a login screen. Log in with your credentials and follow the instructions:
| Click on the Person icon in the top right corner to open a dropdown menu | 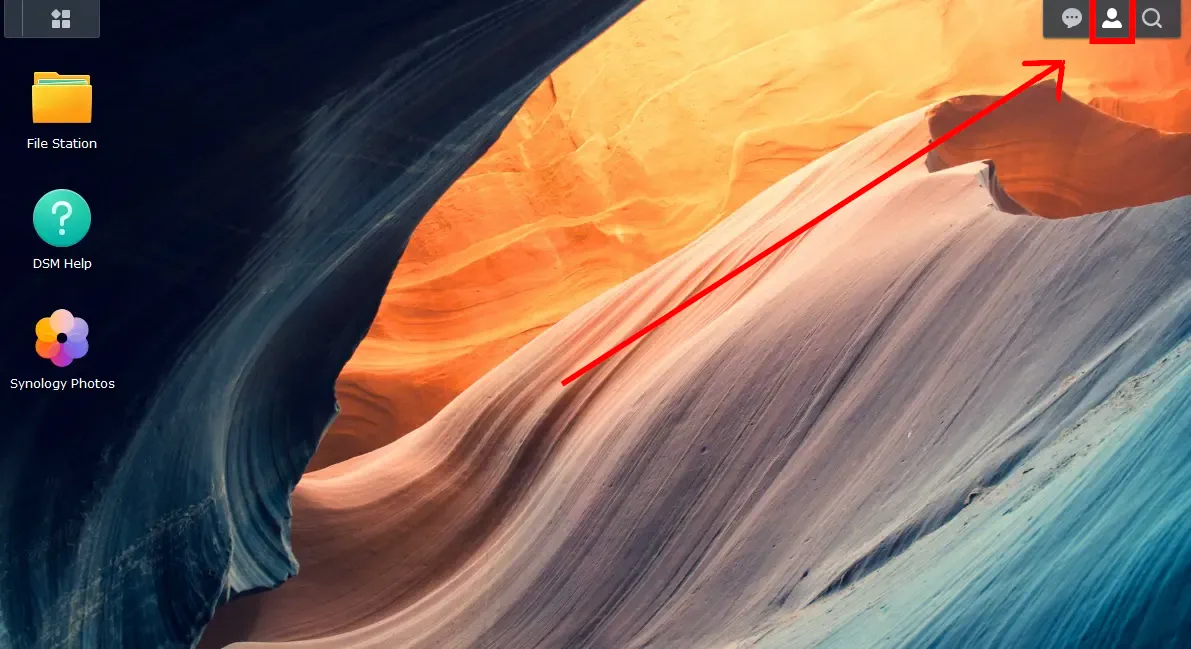 |
|
Click on the "Personal" option in the dropdown menu |
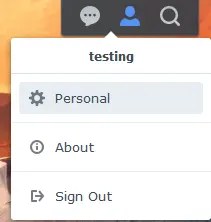 |
|
A window will popup, in there you can change details on your account such as the password and email notifications. |
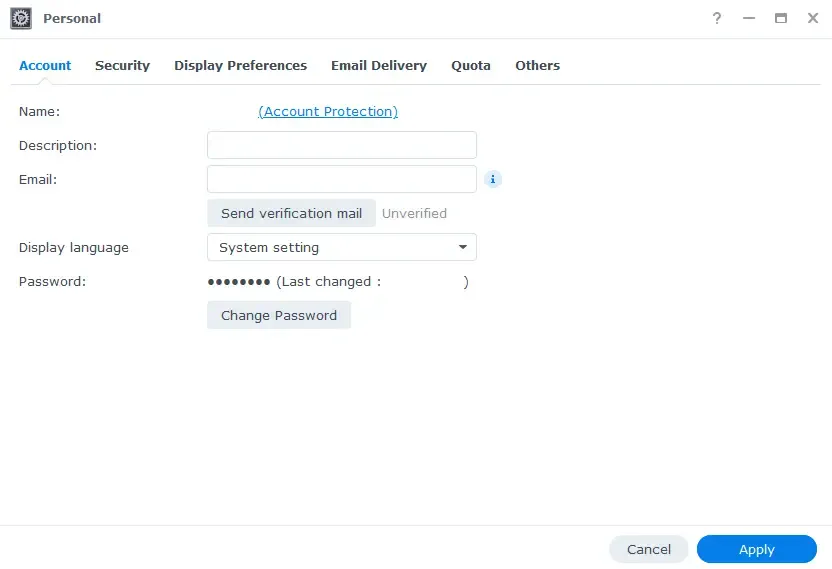 |
Connect to Photos on Mobile
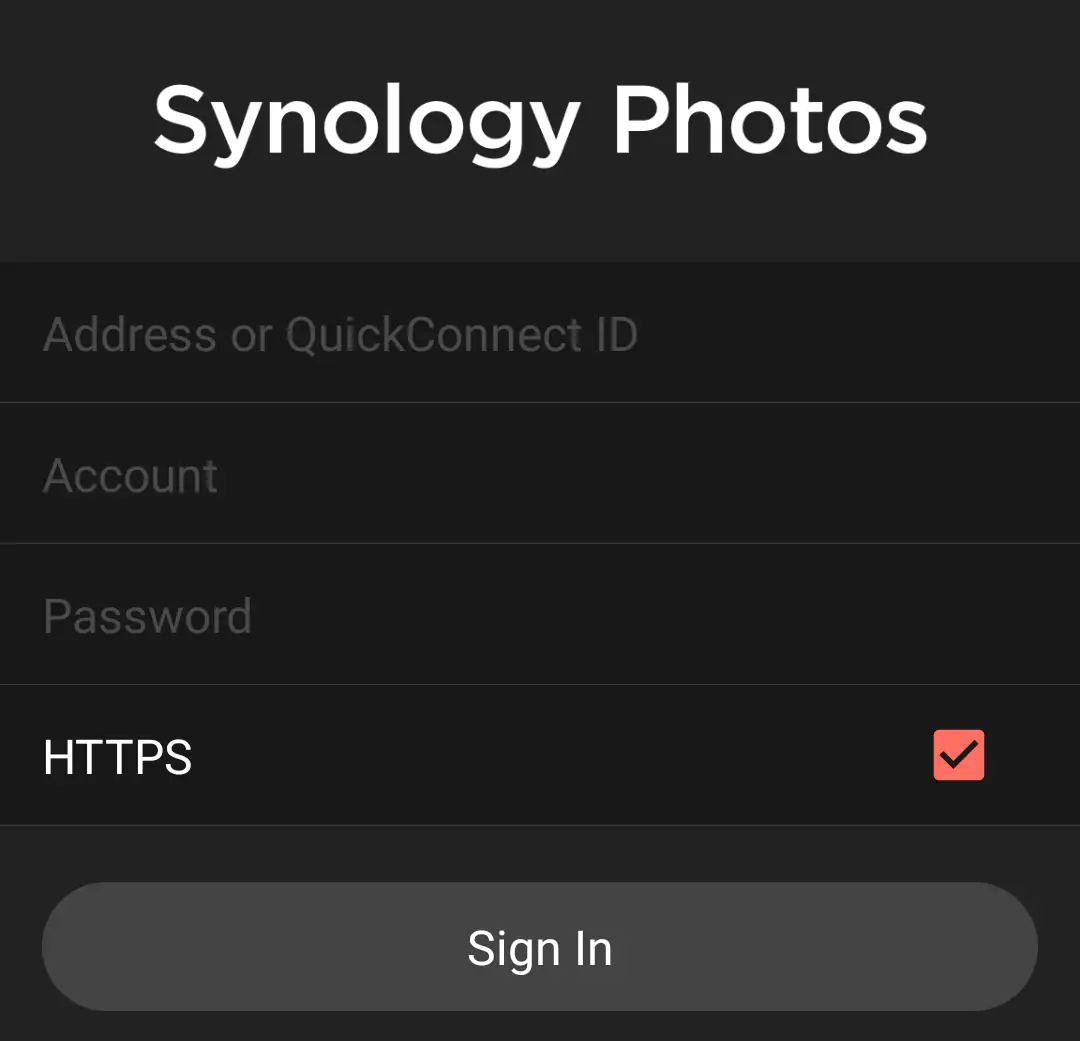
The website and photo viewer works on mobile, but a more fully featured app version is available.
In order to connect you can download the "Synology Photos" app from the:
- App Store on iPhone
- Google Play Store on Android
|
 |
|
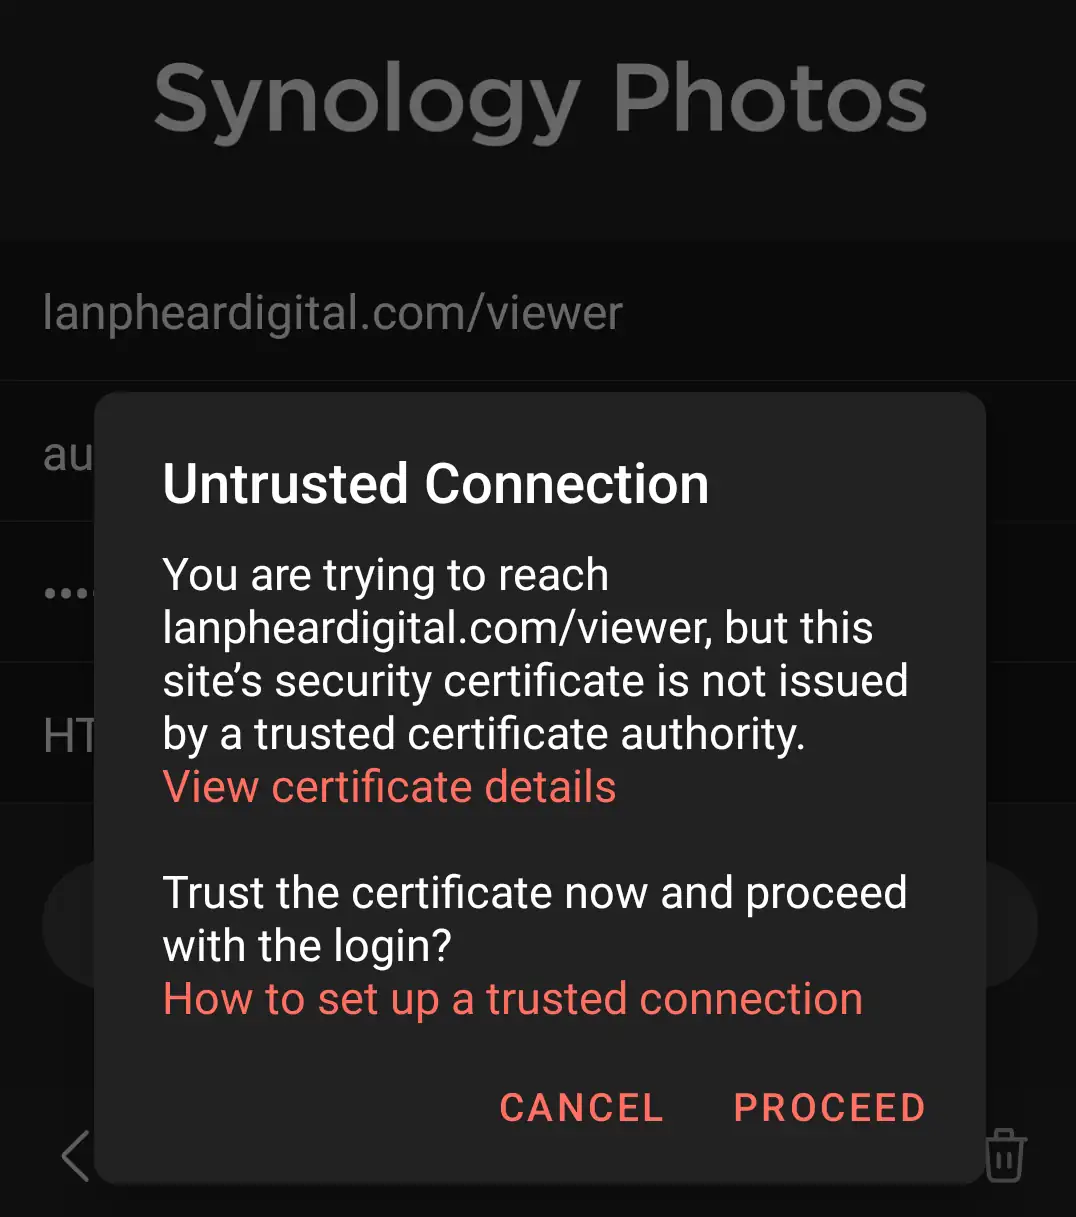
A warning will pop up stating that the connection is untrusted.
This is because the server does not have a sign SSL Certificate.
This is fine since the server does not need one to function and usually is only for outward facing services and businessess.
|
 |
Technical Aspects of Archival
The Devices Used:
For VHS Archival:
Rewind Machine:
Sanyo VWM-365 Playback Machine:
DDV9050 |
|
Capture Card:Elgato Video Capture Device All capture done via Composite video and at highest possible quality in capture software. |
|
Process:The VHS tape is re-round to beginning of tape using the rewind machine. It is then placed in the VCR machine that is hooked up to the capture card. Recording starts on the capture card and then the 'play' button is pressed on the VCR. Once the end of the VHS tape is reached the capture card software stops recording and saves to file as a high bitrate H.264 MP4. For more efficent storage the H.264 MP4 is then lossily converted using Handbrake/FFMPEG to an AV1 MP4. The visual clarity between them is negliable so the AV1 is kept for storage. Since the Synology NAS cannot view the AV1 format as of this point, the AV1 file was converted back into H.264 as a copy for web playback. The quality in the double-converted video is worse, but still viewable and once AV1 support is implemented the H.264 version will be removed. |
|
For Photo Archival:
35mm Film Scanner:
Plustek OpticFilm 8200i AI Scanning Settings:
TIFF files were then converted to Lossless JXL for better file compression. |
|
Flatbed Scanner:
Epson Perfection V600 Photo Scanning Settings:
|
|
Process:
We start with a 35mm film that is loaded onto loading rack and then scanned individually on the Plustek device. Then in the Silverfast software the frame is maximumized to ensure capture of entire frame. Next, NegaFix flips the negative to a positive color and then the image is exported to folder at 3200DPI (the scanner can go to 7200DPI but testing has shown that the doubling in size shows no difference in details). Once lossless TIFF scans are done a script is used to compress the file size.
The command that is used for doing lossless windows batch conversion is:
for /r %%f in (*.tif) do magick "%%f" -quality 100 "%%~nf.jxl"
Note: This requires ImageMagick to be installed on the device
What this does is compresses all the ".tif" files in folder to JPEG-XL, color and pixel data is preserved but lessens the file size.
- JPEG-XL was chosen since it is a newer format developed in 2021 and allows for high precision bit depths, HDR, and large image dimensions.
- The encoding is also using the highest level preset (so effort #9, which is the slowest method but produces a much smaller file than lower efforts). This process usually takes about 1-2 minutes to encode each TIF file to JXL.
Once lossless, the JXL (JPEG-XL) files produced are stored in their respective "Lossless" folders.
- These are the original scans of the films and are unaltered to any edits other than the NegaFix color correction at scan time.
Any exported images are done in the "WEBP" format because it provides better lossy compression than normal JPEGs at a smaller size. These WEBP images are stored and displayed online for others to use since it loads faster than the larger JXL originals and are edited to crop out any unused space and color shifted scans.
All edits would of been exported to lossy JXL since they are smaller than WEBP in some cases but currently as of the time of producing the scans, JPEGXL is only supported in Safari and experimental versions of Firefox. Meaning most user devices would not be able to display the content.
A competiting standard known as "AVIF" is being supported in all major browsers, however it doesn't support 16bit color (12bit max per channel), maxes out at 8K (fine for most content but not for panoramas), and has a slow encoding speed so it is not being used as the archival format. There is also display issues currently with 12bit AVIF photos that cause them to show incorrect colors.
The purpose of keeping the original 48bit scans is so that any future edits to photos can be done without effecting the originals.
For 8mm Film Archival:
Kodak Reels Film Digitizer:
Model Number: RODREELS |
|
Process:
Load the reel-to-reel machine with the 8mm film and set on the onboard software what kind of 8mm it is. The two options being 8mm and Super 8mm, with only a slight increase in width between the two. Once selected, press 'record' on the top of the machine and it starts taking individual photos of each frame.
Once the machine is done taking photos it creates an H.264 MP4 file at 1296p resolution and saves it to a local SD card. This file is then ran through Topaz Video AI to interpolate the 18 frames per second video into 60 as well as downscale the video to 720p. The reason the video is being downsampled is because despite it being high-resolution, the CMOS's sensor doesn't capture details well. Usually the video is a bit blotchy, so 720p was an idea resolution to downsample to; providing a sharper image. The frame-rate interpolation was done to make the video more fluid and natural feeling, since the 18-20 frames-per-second of the original felt unnatural.
Once the modified version is complete the original file is deleted and the new one is preserved in H.265 or AV1 format. Similar to the VHS files, an H.264 version is available on the archive for the purposes of web viewing. Again once AV1 support is implemented the H.264 versions will be removed from storage.